What are transactional emails? The name may sound fancy or technical, but almost everyone has experience with them. A transactional email, or “triggered email” is a type of email sent to facilitate an agreed-upon transaction between the sender and receiver. In other words, a receiver specifically requests the email from the sender. A few examples of transactional emails are receipts, account creation confirmation, password reset emails, and usage notifications. Given that so many people have experience with them, it’s evident that they bring significant value to both consumers and businesses alike.
Creating a Customer Group
There are several companies known for transactional emails, such as Mailchimp, Sendgrid, Sendinblue, and Constant Contact. For the purposes of this article we’ll stick with Mailchimp.
Let’s say I want to inform customers about new products and deals for my electronics business, CM Electronics. On the front end, it’s very apparent how this would be done. Most websites have a type of banner that pops up, like “receive our newsletter” or “hear about deals first.” But what happens in the back end to make that work?
Sign Up for an Account
First, sign up for a Mailchimp account at mailchimp.com. You can then create a group of customers. This group, or audience, can be organized any way you like. It can be for customers receiving your newsletters, customers you want to send deal alerts to, customers who have purchased certain products, etc. Once you have created your audience in Mailchimp, go ahead and install a plugin on your WordPress site called Mailchimp for WordPress (MC4WP). In addition to creating forms, it also takes data entered into that form and sends it to Mailchimp into the previously created audience.

Create a Transactional Email
In order to create transactional emails, we need to grab our API key from Mailchimp in our account API keys. This should be easy to grab and paste into the MC4WP plugin. Then, just save it. Now we can see our “CM Electronics Deals and Seals” audience on our WordPress site. You can also create a form with this plugin. This is especially awesome, given that few plugins are multi-functional like this! Once you have your form created, WordPress gives you a tool called a shortcode. This tool allows you to put your form onto your website without having to do any coding or altering of your theme. Just copy and paste that shortcode into your site, and voila! Your customers can now sign up to receive your deals and steals!

For our purposes, our form is very spartan, but your form can, and should, include more information.
Capturing Customer Information
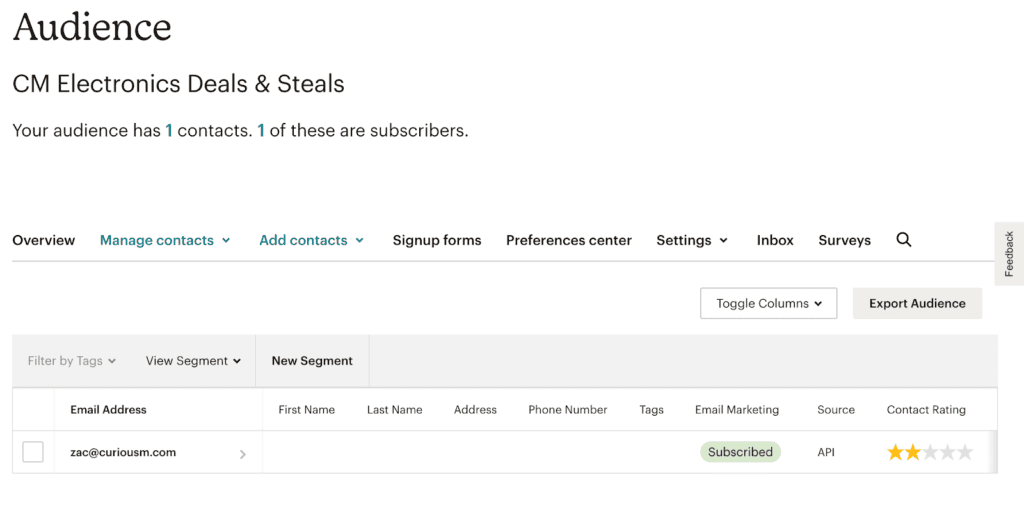
When a customer submits their information, they need to confirm they want to subscribe to your emails. Once they do, you will see the following in your subscriber list (hopefully with more info than just the email).

Now that we’ve captured a customer’s email, we can use Mailchimp’s custom email builder, to easily put together custom emails. Once the email is built, just select the appropriate audience, finish any remaining customizations, and send away!
An Overview of Transactional Email
To recap, a customer consents to receiving emails about our “deals and steals,” and enters their details into our custom form. Our plugin (via API), magically adds their email and other information into our Mailchimp audience. Everyone in that audience receives a “transactional email” whenever we have deals we want them to know about. This process will remain the same for just about any use-case, although in some cases, there may be additional layers of complexity in the middle. For instance, sending out usage alerts would require an automated layer that tracks and triggers emails based on the amount of data, hours, etc. However, the basic elements stay the same.
That’s it! Hopefully you’ll be able to utilize transactional emails to help bring value to your website.


